Compiling Zig to RISC-V
In my second Advent of Writing post I described the reading group we have where we learn to build performant components used in neural networks to run on a small RISC-V computer.
So far I’ve just booted it, but now let’s look at actually running some code on it. Most of the examples out there are C, so I thought I’d take on the challenge of using Zig instead to see what it’s like. Turns out, getting some basic things working is super easy.
For this, I’m using Zig version 0.15.2. If you’re using older versions of Zig, things might look different.
The first thing is to create a repository and run zig init to get the basic scaffolding. We’re doing a simple ReLU, and after changing some file names, this is what I have:
tree
.
├── build.zig
├── build.zig.zon
└── src
    ├── main.zig
    └── lactose
        ├── nn
        │   └── relu.zig
        └── root.zig
Since we’re using the Milk-V Duo, the name of my neural networks library will naturally be Lactose.
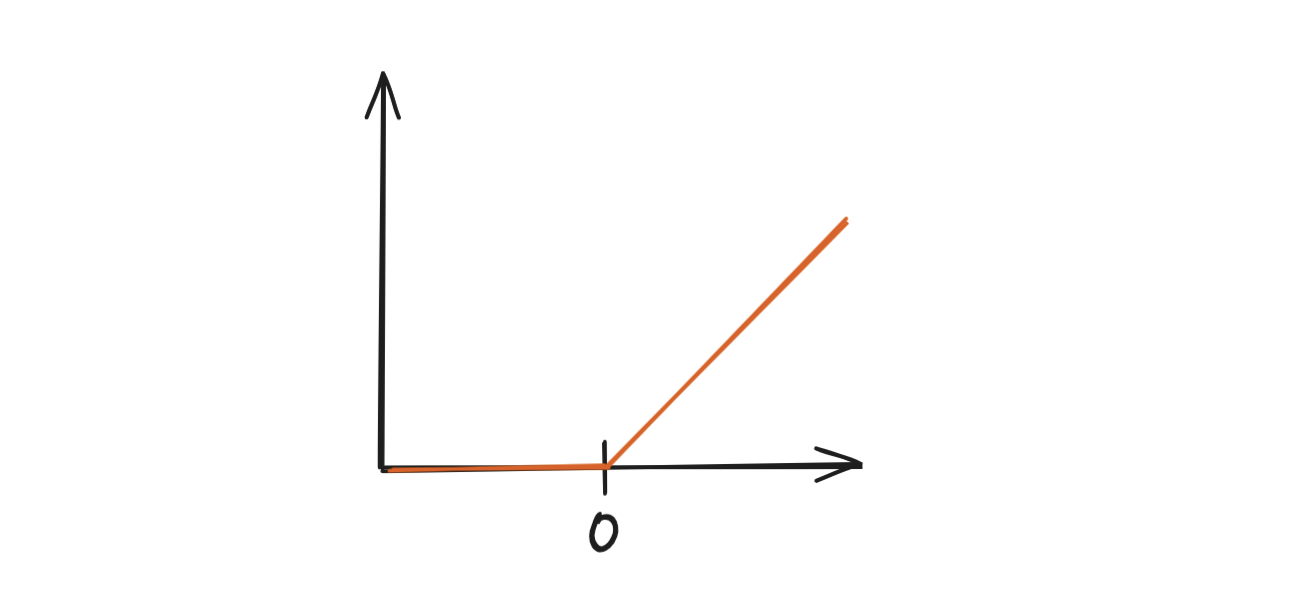
As a quick reminder before we dive in, this is the ReLU function: if the value x is greater than 0 we leave it be, otherwise we set it to zero.
So in code the relu.zig would be:
pub fn relu(comptime T: type, x: []T) void {
    for (x) |*elem| {
        if (elem.* < 0) elem.* = 0;
    }
}
Nice!
Now our root.zig just exports this function like so:
pub const relu = @import("nn/relu.zig").relu;And we can write an executable which uses this ReLU function on a slice. Something like this:
const std = @import("std");
const lactose = @import("lactose");

pub fn main() !void {
    var prng = std.Random.DefaultPrng.init(42);
    const rand = prng.random();

    var data: [512]f32 = undefined; // 1K floats

    for (&data) |*x| {
        x.* = rand.float(f32);
    }

    lactose.relu(f32, &data);

    std.debug.print("{any}\n", .{data});
}
I’ve also made my build.zig file very convenient so that I can just run zig build and it does all the correct things for me. Honestly, the build file is probably where I spent most of my time. Since it’s quite long, I’ll just leave it here so you can inspect it later if you want. Note that some of the choices I’ve made are dependent on how I set up my Milk-V Duo. For example, if you’re using libc instead of musl, you’ll need to change that.
Click to view the full build.zig
const std = @import("std");
pub fn build(b: *std.Build) void {
const target = b.standardTargetOptions(.{
.default_target = .{
.cpu_arch = .riscv64,
.os_tag = .linux,
.abi = .musl,
},
});
const optimize = b.standardOptimizeOption(.{});
const mod = b.addModule("lactose", .{
.root_source_file = b.path("src/lactose/root.zig"),
.target = target,
.optimize = optimize,
});
const exe = b.addExecutable(.{
.name = "main",
.root_module = b.createModule(.{
.root_source_file = b.path("src/main.zig"),
.target = target,
.optimize = optimize,
.imports = &.{
.{ .name = "lactose", .module = mod },
},
}),
});
b.installArtifact(exe);
const run_step = b.step("run", "Run the app");
const run_cmd = b.addRunArtifact(exe);
run_step.dependOn(&run_cmd.step);
run_cmd.step.dependOn(b.getInstallStep());
if (b.args) |args| {
run_cmd.addArgs(args);
}
const mod_tests = b.addTest(.{
.root_module = mod,
});
const run_mod_tests = b.addRunArtifact(mod_tests);
const exe_tests = b.addTest(.{
.root_module = exe.root_module,
});
const run_exe_tests = b.addRunArtifact(exe_tests);
const test_step = b.step("test", "Run tests");
test_step.dependOn(&run_mod_tests.step);
test_step.dependOn(&run_exe_tests.step);
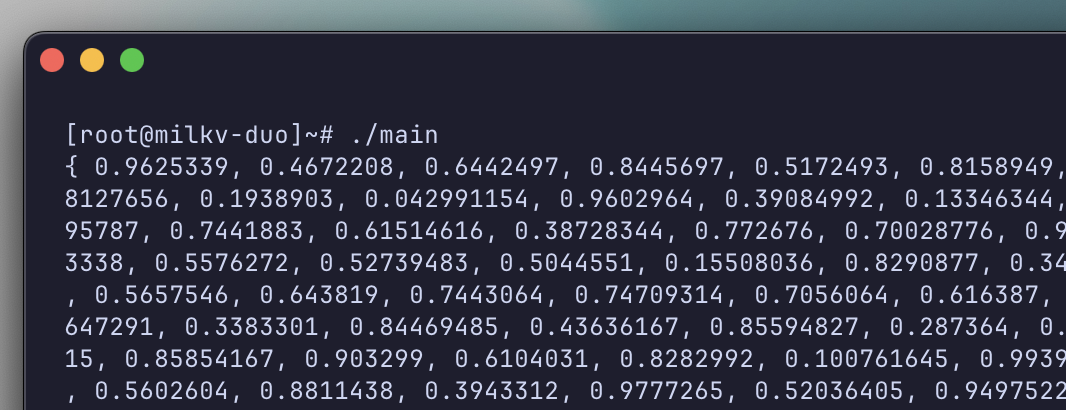
}Anyhow, simply running zig build gives me the main executable which I can copy into the Milk-V with this command: scp zig-out/bin/main root@192.168.42.1:/root/
And ssh:ing to the Milk-V, voilà:
Now to understand if this is performant or not, one crucial part is to analyze the assembly. Did the compiler generate something clever or naive for us? You can run something like riscv64-elf-objdump -d -C -S zig-out/bin/main to disassemble the binary. It’s quite messy, so I recommend piping it into a text file.
If you search for “relu” and hit enter a few times you should be able to find our function looking something like this:
pub fn relu(comptime T: type, x: []T) void {
 1080f04:	715d                addi	sp,sp,-80
 1080f06:	e486                sd	    ra,72(sp)
 1080f08:	e0a2                sd	    s0,64(sp)
 1080f0a:	0880                addi	s0,sp,80
 1080f0c:	852e                mv	    a0,a1
 1080f0e:	fca43023          	sd	    a0,-64(s0)
 1080f12:	fcc43c23          	sd	    a2,-40(s0)
 1080f16:	fcb43823          	sd	    a1,-48(s0)
 1080f1a:	4501                li	    a0,0
 1080f1c:	fea43023            sd	    a0,-32(s0)
 1080f20:	fcc43423          	sd	    a2,-56(s0)
And that’s the start of the function.
Now this isn’t optimized at all, we compiled with Debug. A few things that stand out without going too deep:
- The first instruction allocates 80 bytes for us on the stack; we don’t really need that much.
- Second is that there’s a lot of register spill and redundant operations. Meaning that we’re moving and storing a lot of stuff in memory which could have lived in the registers.
Here for example we’re storing the same thing twice in memory 🤷♂️
1080f12:    fcc43c23    sd a2, -40(s0)
…
1080f20: fcc43423 sd a2, -56(s0)- Then later on the loop itself is very unoptimized, but I’ll get to that in another post!
This ended up being just a scratch on the surface, but at least it’s an end-to-end example. Hopefully, this helps you if you’re building on RISC-V machines as well. In some upcoming post, I’ll need to go more in-depth into the assembly and how to optimize this ReLU function.
Happy hacking!